

Running many locations at once is a good place to learn. In a BCA press release from 9 November 2026, Rocket Chicken shared how it grew from one branch in Semarang in February 2010 to more than 1,450 branches in 90 cities, and the workforce grew from 7 people to around 13,000. BCA payroll services pay the staff across those branches.
The owner and CEO, Nurul Atik, put the lesson plainly: regional expansion must be done with careful calculation, not simply by opening branches in many cities. The hardest part is keeping products, staff, and sales data from mixing into one pile.
That is where the outlet management feature in the Qasir app helps. It gives you one place to set up and manage every outlet, covering products and staff alike.
What Is the Qasir Outlet Management Feature?
Qasir outlet management means running the whole business per branch. Instead of one shared product list and one shared roster of employees, each location gets its own settings that you can review whenever you open the app. It covers products and staff, the two things that tangle up once a business grows beyond a single place.
Before this existed, a second branch meant a second notebook, plus notes about which employee stood behind which counter. Every sale, stock adjustment, and handover was written down somewhere else. The official Qasir guide on managing branches describes it as a way to handle every setting and record per location, including products and staff.
For a small business owner, the result is simple: one app holds the picture for every branch.
How to Use the Qasir Outlet Management Feature
Setting up branches in Qasir takes a few taps:
- Open the app and tap the Outlet symbol on the Home menu. Every branch you own appears there, and the one in use is marked active.
- To add a branch, tap the + button. On the form, fill in the branch name, insert a photo of the branch, set the location, and pick the staff who will work there.
- Tap Save when the form is complete, and the new branch is added to your list.
- To change an existing branch, open the Outlet menu and tap its name in the list, then update the photo, name, number, address, and location, and tap Save.
- To place staff, tap the Choose Staff icon on the form, select the people to assign, and tap Save. To remove someone, tap their name in the list.
The fields below come from the official screen in the app:
| Field | What to Fill In | Example Entry |
|---|---|---|
| Outlet Name | The branch name in the app | Solo-branch-2 |
| Phone Number | A number to reach the branch | 0271 123 456 |
| Outlet Address | The street and building | Jl. Slamet Riyadi 45 |
| Village and Postal Code | The area and postal code | Banjarsari, 57131 |
| Outlet Location | The map point on the map | Pin on the Solo map |
| Staff Placement | The employees assigned there | Rina, Dimas |
Once the first branch is ready, the second takes minutes, not hours. If you are still building the basics, start with the guide to starting a business with Qasir.
Fits Three Types of Business
Managing several branches in Qasir makes the most sense when you already run more than one location. Here are three illustrations:
- A coffee shop in Gayo - cashier records, stock, and sales reports for each branch stay separated, so you no longer need one notebook for every location.
- A motorbike repair shop in Solo - the work and the costs of each workshop can be split apart, so branch capital does not mix with the main shop money.
- A grocery store in Bekasi - staff can be placed in a new location right away without overwriting the old cashier data.
These are usage illustrations, not promised results. Once the setup is in place, the guide to accessing the Qasir dashboard from your phone helps you follow the numbers.
Tip 1: Complete Outlet Details Before Adding a Branch
Most mistakes in branch management happen because a location was saved with half-finished details. A branch with no photo, no phone number, and no map point is hard to recognise later.
- Fill in the name the way your team says it out loud, for example Solo-branch-2, so nobody has to guess which location a record belongs to.
- Add a real photo of the storefront, so a new employee knows at a glance they are at the right branch.
- Complete the address down to the postal code, then drop the map point on the actual building rather than on the street name.
- Save the form, reopen it once, and check that every field was stored correctly before you move on.
The feature only stays useful when the base data is clean. A five-minute check now saves hours of reconciliation later.
Tip 2: Assign Staff Duties to Each Outlet
Staffing is where branch management usually breaks down. One person covers two locations, a shift changes without a handover note, and the register at the end of the day no longer matches the money in the drawer.
- Open the branch and tap Choose Staff to see who is already attached there.
- Add the employees who really work there, and remove anyone who has moved to another branch.
- Give each person one clear responsibility, for example cashier, stock, or shift lead, so nobody guesses what to do at handover.
- Write down the handover rule for each branch in a short note, so the person closing the shift knows what to check.
With the right people on the right branch, the cash report at closing time makes sense on its own.
Tip 3: Review Each Outlet's Sales Data Regularly
Setting up several branches is the easy part. Keeping an eye on each one is the work that pays off. A short review every week is enough to catch a slow branch before it drains your cash for a month.
- Compare the sales total of each branch at the same day and hour, so a busy Saturday is not mistaken for a better branch.
- Check which products move in one location and stall in another, then adjust the stock list per branch accordingly.
- Use the guide to reading sales data to find the items that carry the revenue before you reorder.
- Note the reason behind every stock decision, so the next review is a comparison and not a guess.
Regular outlet review turns a list of locations into decisions you can act on, and keeps each branch from quietly draining the others.
FAQ About the Qasir Outlet Management Feature
These are the questions business owners ask most often about branches, staff, and product settings.
Can I Have More Than One Outlet in Qasir?
Yes. Each business can hold several locations, and each one keeps its own products, staff, and sales records. You switch between them from the Outlet menu, so the cashier always works on the branch they are in.
Does Editing an Outlet Change the Data I Already Have?
Editing only updates the information on the outlet form, such as the photo, name, number, address, and location. Sales and stock records stay attached to that branch, so tidying up details never moves your old numbers elsewhere.
Can I Move a Staff Member From One Outlet to Another?
You can. Open the branch where the person currently sits and tap their name to remove them, then open the new branch, tap Choose Staff, and add them there. Placement stays separate, so records follow the person.
Does a New Outlet Need Its Own Product List?
Products are managed per branch, so each location can hold a different quantity of the same item. A best-seller downtown may not move at all in the suburbs, and you can even set a different price per branch with the wholesale price feature.
Is There a Limit on How Many Branches I Can Add?
Qasir does not publish a fixed cap on the number of branches a business can run. Ask the Customer Happiness Team through live chat first.
Business and Finance Tips
Managing several branches is a financial exercise as much as an operational one. The figures below come from the Accounting+ guide on financial reports for culinary expansion.
- Know your margin and break-even point per branch. A healthy net margin sits around 15 to 20 percent after every operating cost is deducted, and each location should pass that mark. Calculate how much monthly revenue a new branch must reach before rent, salary, and stock cover each other, then set it as the third-month target.
- Hold a cash reserve of 3 to 6 months of operating costs. Before opening the next location, keep enough cash to cover the running costs of the new branch for several months, on top of what you already carry.
- Check the current ratio above 1.5 before expanding. For small businesses, a ratio between 1.5 and 2 is the conservative line. If the branches you already run sit below that, adding one more location raises the risk instead of lowering it.
- Keep business money away from personal spending. Open a separate account for the business and review it monthly, so the cash of one branch never quietly funds a personal expense.
The hardest part is consolidating data and keeping costs consistent between branches. A clean setup in Qasir gives you that picture, and the guide to recording income and expenses keeps numbers together.
Qasir Features for Outlets and Branches
Qasir has several features that work together around a branch. Here are four of them:
Kelola Outlet to Centralize Branch Data
Kelola Outlet is where every branch is created, edited, and switched between, with its own form and settings. The benefit is that each branch's data stays in one place instead of being spread across separate notebooks.
Kelola Pegawai to Place the Team at the Right Location
Kelola Pegawai attaches employees to a specific branch through the Choose Staff icon on the outlet form. The benefit is that each branch knows who works there, so reports and handovers no longer rely on memory.
Kelola Produk for Stock That Differs per Outlet
Kelola Produk manages the product list and stock quantity per branch, so the same item can carry a different number in different locations. The benefit is that you order for what actually sells in each place instead of the same quantity everywhere.
Ganti Shift Pegawai for Cash Handover at Every Outlet
Ganti Shift Pegawai records the shift change and the handover of the register at each branch. The benefit is that the cash in the drawer at closing time can be checked against that branch's sales report.
What the Qasir App Screens Look Like
Here is what the branch screens look like inside the Qasir app:
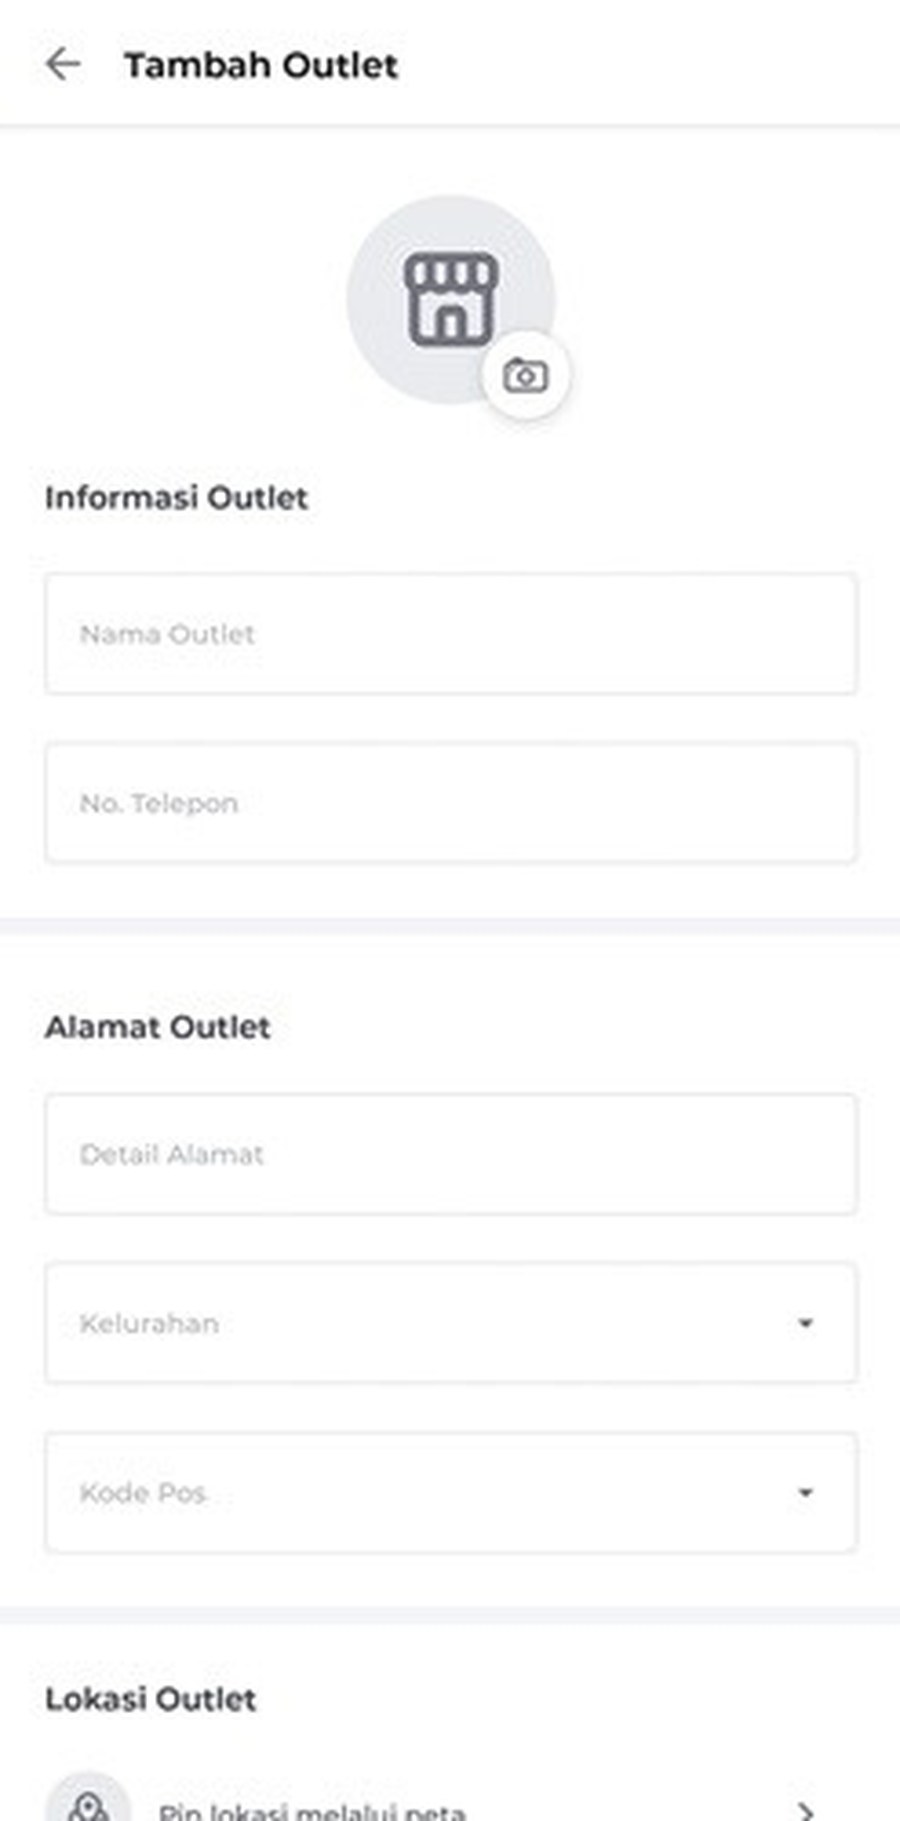
The Add Outlet form in the Qasir app, complete with the name, location, and staff placement columns.
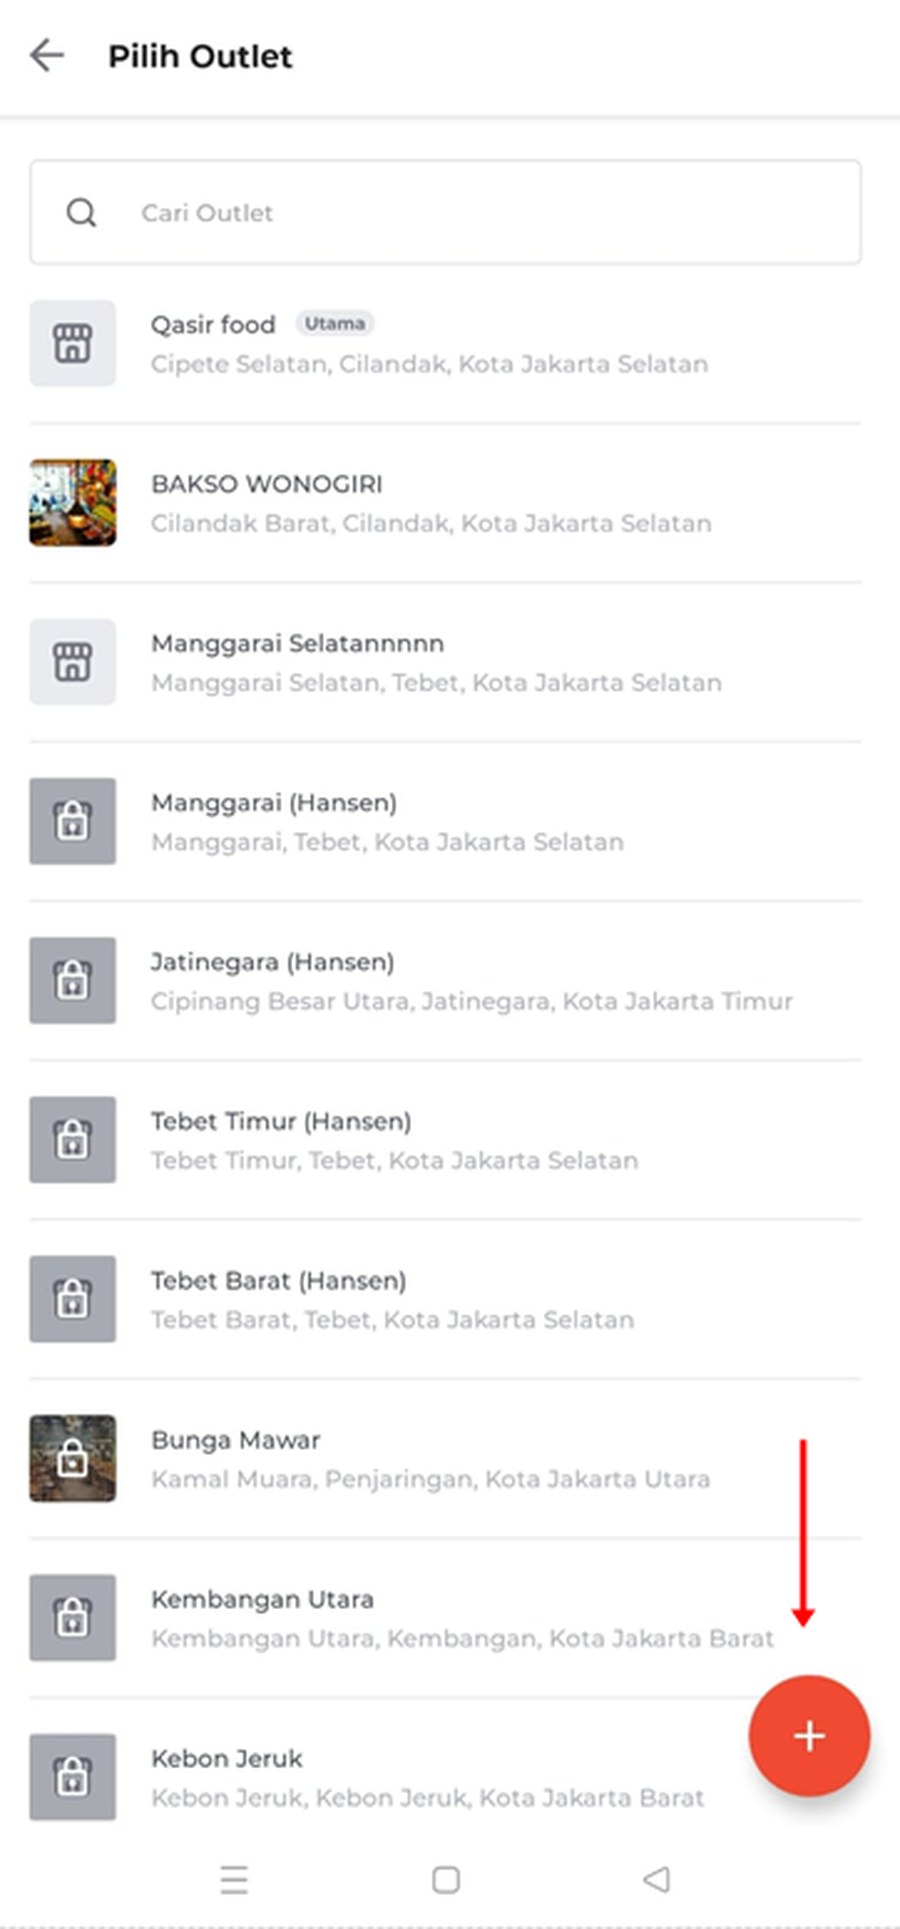
The list of outlets and the active outlet option when switching branches in the Qasir app.
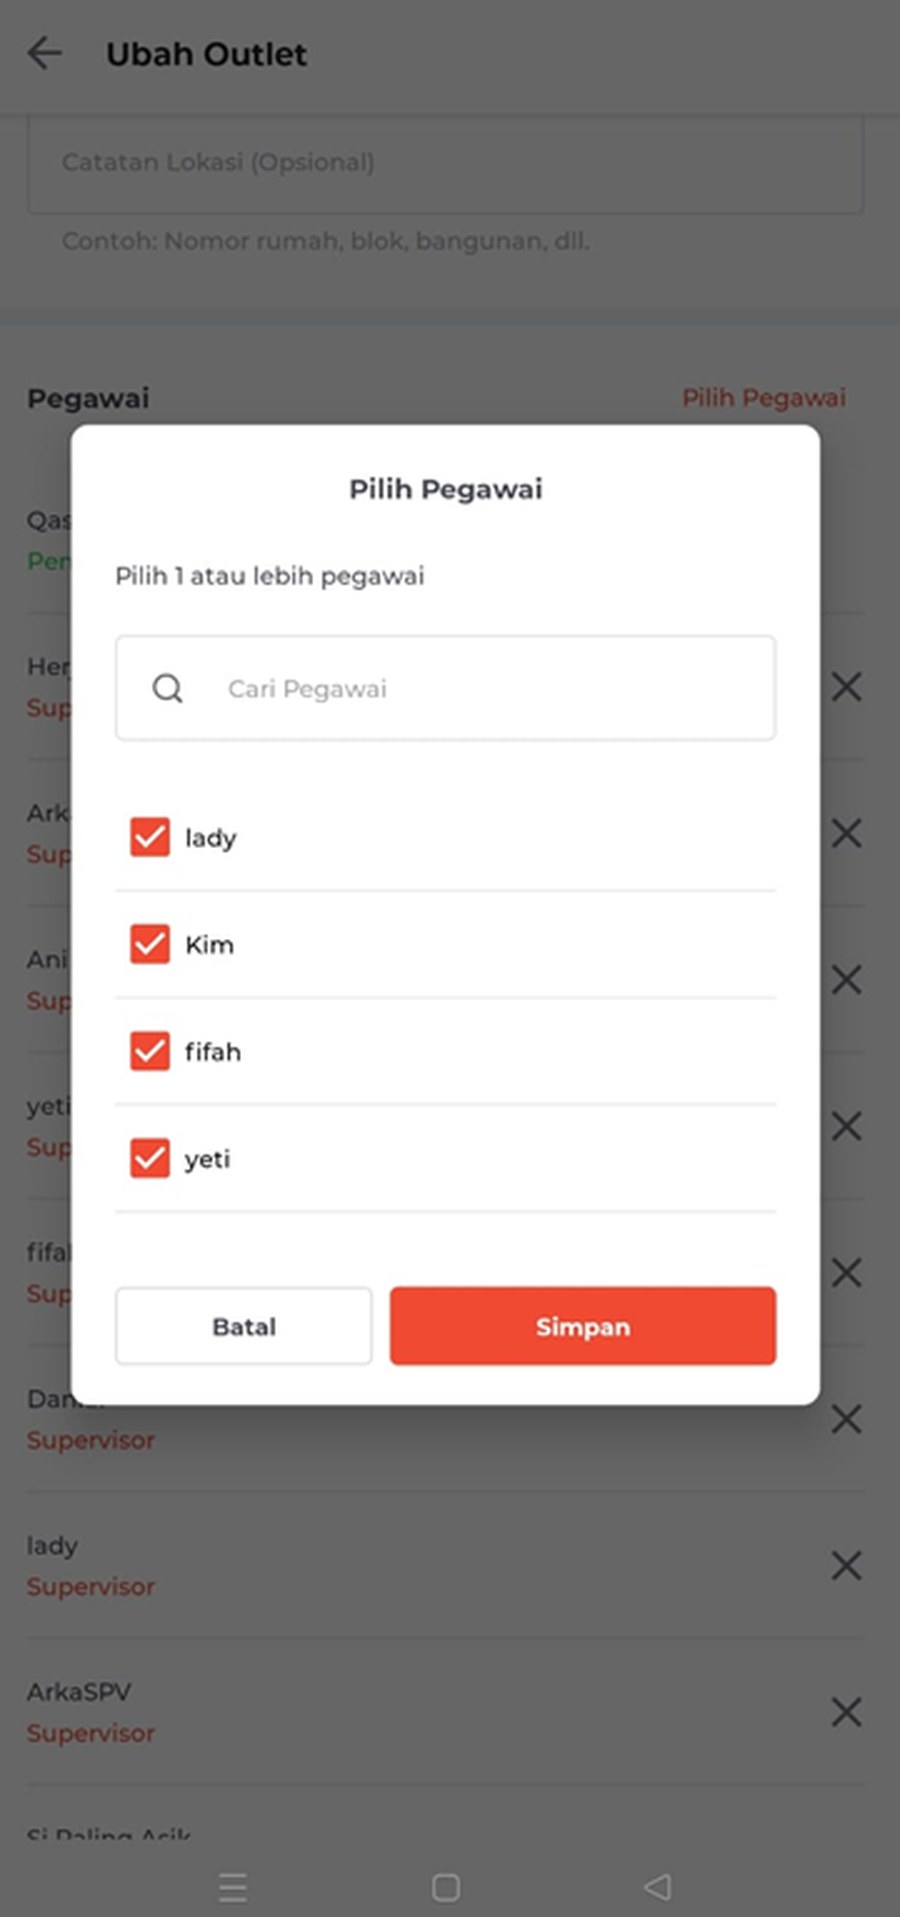
The Choose Staff window for placing employees at a specific branch in the Qasir app.
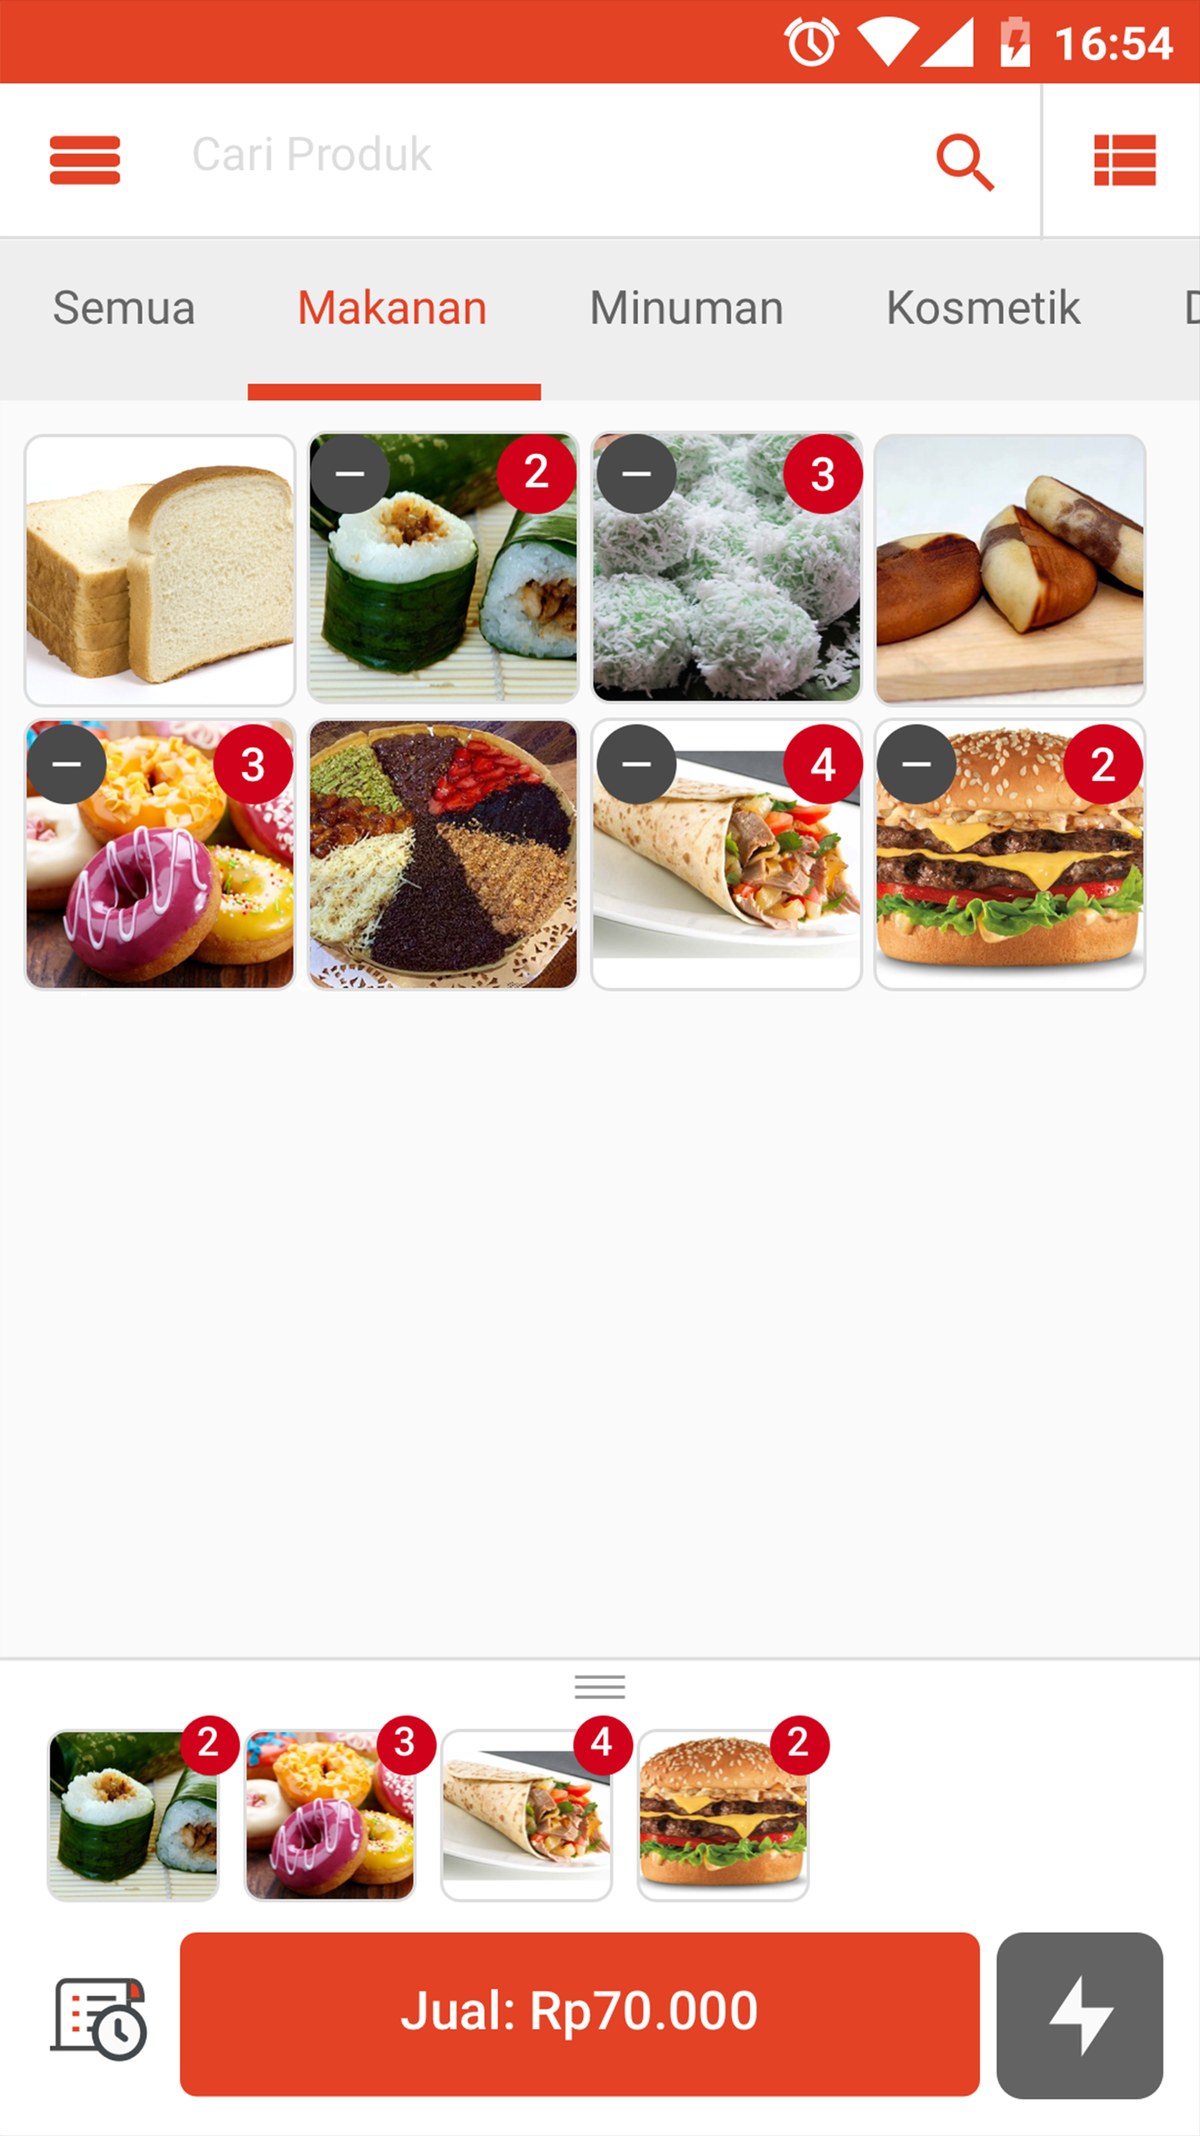
The product catalog with categories and item quantities that can be adjusted for each branch.
Conclusion
Managing several branches is mostly a matter of keeping details in one place, and the Qasir outlet management feature does exactly that. Every branch gets its own form, products, staff, and reports, so the numbers of one location never quietly blend into another. Set the fields properly, assign the people clearly, and review each branch on a schedule. For a small business owner, that is the difference between running two shops and running one business with two shops inside it.
Ask the Qasir Team If Something Is Still Unclear
If something still feels unclear about how to use the outlet management feature, the Customer Happiness Team is ready to help. Open the Help feature in the app or on the Qasir website, then start a Live Chat. Feel free to attach a screenshot or a short video so the answer is more precise. These are the Qasir features owners ask about most often:
- Kelola Outlet - create and edit every branch from one place, with its own photo, address, and map location.
- Kelola Pegawai - place the right employees in the right branch and keep the shift list accurate.
- Kelola Produk - set the product list and stock quantity that fit what actually sells in each location.
- Cash Recap - see the cash recap per branch and compare the money in the drawer with the sales report.
- Sales Reports - read the sales report of every branch side by side, so a slow location is easy to spot.
There is also a guide to contacting the Qasir team with step-by-step instructions in the Help Center. Download Qasir for free on the Play Store, and never hesitate to ask when you get stuck.